Perhaps the most common complaint among Alinco DX-70 users has to do with the poor performance of the noise blanker (NB). I have to agree--the NB performance is pathetic. Like other DX-70 users, I've found that the NB virtually destroys the desired signal, especially if the noise source is ignition noise from an engine operating at normal highway RPMs. Unfortunately, Alinco is unable to offer a remedy for the problem.
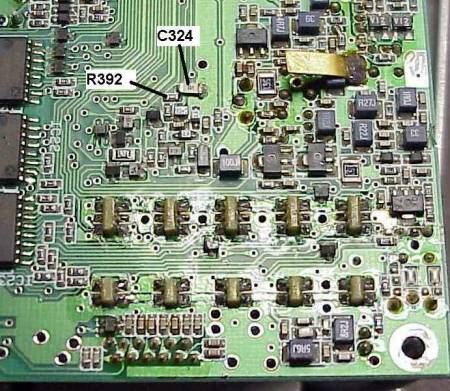
A noticeable improvement can be made to the noise blanker by changing the value of C324 on the Main Board to a smaller value. This mod allows the noise blanker to attack more quickly on noise pulses and it also reduces the duration of the blanking action. It is also necessary to verify the value of R392 to ensure the correct NB time constant exists. These components are located on the backside of the Main Board, which is the PC board located under the unit's top cover.
This mod takes the NB from being virtually worthless to being at least somewhat useable on impulse noise from ignition systems and power-lines. While I'd like to see still better performance from the NB, this appears to be about the best I could do with only minor changes to the circuitry.
Parts required:
0.039 uF capacitor, 0603 size (or a 0805-size part can be made to work). Perhaps a 10 k, 0603 resistor, 5%, depending on your radio.
Procedure:
CAUTION: This modification involves raising up a printed circuit board and replacing one or two small 0603-size components. While this is not a particularly difficult task, it does require some skill with working with surface-mount components and PC boards. If you are not comfortable with working with very small surface-mount components, refer the task to someone who is.
- With DC power removed from the unit, remove the front panel and disconnect the two connectors from the front panel. Note the way the cables are routed through the plastic blank plate on the front of the radio. Also, remove the Microphone.
- Remove the radio's top cover (5 screws) and the bottom cover (7 screws). Remove one screw holding the blank plate to the front of the chassis. The blank plate then snaps off the upper and lower front chassis rails.
- Remove the two screws securing the speaker bracket. Lift the speaker and bracket up and away (and you can disconnect it at the PC board connector if you want to get it out of your way).
- Remove the two screws securing the front top rail, and remove the top rail. Remove the two screws securing the front bottom rail, and remove the rail by pulling it forward to disconnect the connector that is located near the microphone connector.
- Pull up and remove the small PC board (Connector Unit) that the front-panel cables attach to.
- Remove the two spring clips that secure the two ICs (IC11 and IC20) to the chassis on the left side of the unit.
- Disconnect the two coax cables (J3 and J4) near the front of the Main Board.
- Disconnect the ribbon cable that goes into the front of the Main Board. To release the ribbon cable from the connector, use a pointed tool to push forward the locking tabs located at each end of the connector.
- Remove the 6 screws holding the Main Board to the chassis and carefully lift the front edge of the Main Board up and lay the board back onto the transmitter's heat sink. The remaining cables to the Main Board are left connected.
- Using the picture below, locate C324 on the bottom side of the Main Board and remove it. Replace it with a 0.039 uF (39000 pF capacitor). A 0603-size part fits on the original pads. A slightly larger 0805-size capacitor can also be used (as shown in the photo) if you first scrape away a bit of the solder mask on the ground end to accommodate the larger part.

- Locate R392. Verify that it is a 10 k ohms. The value code "103" is printed on top of a 10 k resistor in very small print. (Placing an ohmmeter across R392 in the circuit will read about 6.5 k to 7.5 k, depending on the polarity of the ohmmeter leads, if it is a 10 k.) My DX-70 came from the factory with a 10k, however the schematic in the service manual shows it as being a 4.7k. If the value is other than a 10k, replace it with a 10 k 0603-size part.
- Reassemble the unit, reversing Steps 1 through 9 above. Remember to push the locking tabs back in after reconnecting the ribbon cable (step 8). Also be sure to carefully align the connectors when reinstalling the Connector Unit (step 5) the lower chassis rail (step 4).
Now go for a drive and see what you think of the NB performance. With the NB turned on, you will still hear a portion of the desired signal being cut out during the blanking action, but the signal can generally be heard through it. If the interfering signal is relatively weak, you may be better off running with the noise blanker off. On some signals a bit of a reduction in the level of the desired audio may also be noted when the NB is switched on. Remember that the best way to get rid of ignition noise is to suppress it in the vehicle itself. Mobile safely.
|


