 |
 |
| Kenwood TH-F6 A (TH F6A THF6A) Service Menu |
 |
Yes! This little toy is having yet a “Service Menu” packed inside.
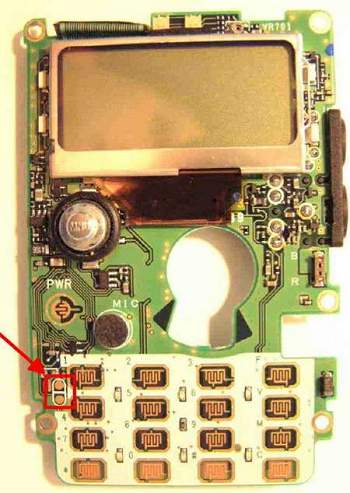
Unfortunately, this is not for everybody. It is only for the “I MUST open any electronic box I own” kind of guy. The service menu switch is located inside the transceiver, on the keyboard PCB, close to the “1” and “4” keys.
To find the switch contacts you must open the case as described in the MARS/CAP modification page.
The “Service menu” switch contacts are shown in the next picture:

If you have opened your toy, what about having an external switch for “Service menu”? Check out my external “Service Menu” switch page.
With or without the external switch, you will be able now to start the TH-F6 transceiver and close momentary the “Service Menu” switch. You may also keep the “Service Menu” switch pressed when powering on the TH-F6. In this case, flashing “PF1” will appear on the screen. Any other key but “Service menu” will leave the transceiver in normal mode. Pressing “Service menu” again will make the “rectangled minus” offset symbol flash and any key pressed will put the transceiver in “Service mode”.
NOW, DO NOT, I repeat, DO NOT PRESS “Ok”!
If you do, the transceiver will not die, but will report empty battery all the time ;-)
Before going further, a few notes for you:
- When I write “do not do that”, try not to. If you will (and I would :), you will write me a wet letter about your broken transceiver. I will enjoy it, however, I may be out of my webmail, having pictures in Alaska and unable to respond ;-)
- In “Service mode”, pressing the “Multi-scroll” right/left will navigate forward/backward form one service menu to another. Pressing the “Multi-scroll” up/down will change the frequency/memory channel.
- In “Service mode”, rotating the “Tuning control” will change the service menu value. Some service menus are not modified this way. In this case pressing “Ok” will store the current value (displayed usually on the left part of the screen). This is bad, because you may need some special laboratory devices in order to have your TH F6 working again. So, pay attention with that “joy-stick” ;-) Sometimes when you try to press right, you may press “Ok”. This is the “sad-stick” hidden feature:) For other menus you may be not able to set any value, depending on the current “Band”. Change the band and you will see those stars (“**”) becoming numbers…
- In “Service mode”, the “LAMP” key will light on but will activate the “Menu” in the same time.
- Some service menus carry different values for each “Band”. Changing the “Band” in “VFO A” or “VFO B” will allow you to see/change values for every “Band”.
- Pressing “A/B” will change the current VFO, giving you access to all eleven bands(in VFO B) or only to the VFO’s A bands. For some settings will be handy to switch only between VFO’s A bands (using “BAND” key).
- Before changing thinks, try to write down those values. Pay attention, some values are different for each “Band” and you have eleven of those… However, some of the values are not critical and can be restored from my TH F6 values shown later.
- Please share with us your findings, subscribing the results on our Yahoo Group. I hope one of these days I’ll have a “Submit ‘I broke my radio’ email page” on my website.
Next page >>
|

|
|


